Learning about penetration testing methodology and techniques is always exciting. While many professionals may focus on specific types of penetration testing such as internal assessment, external assessment, social engineering assessment, or even web application security testing, it is always useful to understand how to conduct penetration testing on wireless corporate networks and how to compromise the Microsoft Windows Domain.
In this article, you’ll learn how to set up your Active Directory (AD) lab environment, which will allow you to perform advanced red team techniques, such as discovering ways to compromise an organization’s Windows domain controller (DC). In addition, you will also learn how to create a wireless penetration testing lab environment to simulate advanced wireless network hacking techniques.
In this section, we will cover the following topics:
- Creating an AD Red Team Lab.
- Creation of a wireless network penetration testing laboratory.
Let’s dive in!
Technical Requirements
To complete the exercises in this section, make sure you meet the following hardware and software requirements:
- Oracle VM VirtualBox : https://www.virtualbox.org/.
- Windows Server 2019
: https://www.microsoft.com/en-us/evalcenter/evaluate-windows-server-2019 - Windows 10 Enterprise : https://www.microsoft.com/en-us/evalcenter/evaluate-windows-10-enterprise.
- Ubuntu Server 20.04.2 : https://ubuntu.com/download/server.
- FreeRadius : https://freeradius.org/.
- A physical wireless router that supports WEP, WPA2-Personal and WPA2-Enterprise security standards .
Creating an AD Red Team
AD Lab is a role in the Microsoft Windows Server operating system that allows system administrators to effectively manage all users, devices, and policies in a Windows environment. AD ensures that centralized management is available for user accounts across the entire organization and that policies can be created and assigned to different user groups to ensure that people have the necessary access rights to perform actions related to their job responsibilities.
AD is commonly found in many organizations around the world. It is important to understand how to detect various security vulnerabilities in a Microsoft Windows domain and exploit these security flaws to compromise an organization’s DC as well as its systems, services, and shared resources.
In this section, you will learn how to create a Microsoft Windows lab environment with Microsoft Windows Server 2019 , multiple client systems running Microsoft Windows 10 Enterprise, and Kali Linux 2021 as an attacker machine. This lab environment will allow you to practice advanced penetration testing techniques, such as red team exercises, on a Windows domain.
The following diagram shows the topology of our Windows Red Team lab :
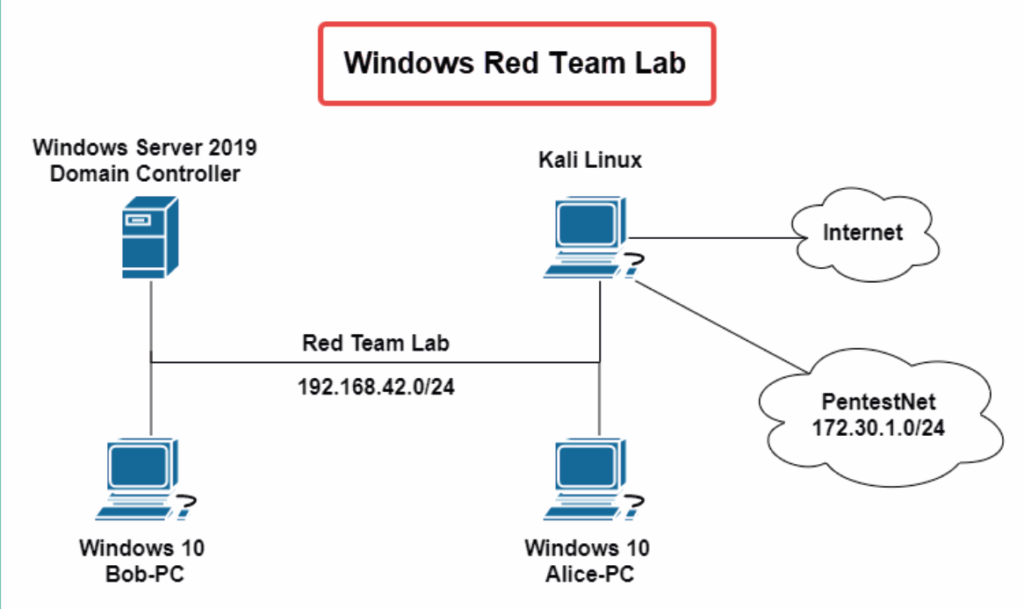
As we can see, Kali Linux is directly connected to systems in the Windows environment. Further in the following sections, you will learn how to apply exploitation and post-exploitation techniques to targets, so when you exploit systems in a Windows domain, we will assume that you have already compromised the network (post-exploitation). For now, we’ll focus on setting up our environment for future security testing.
The following table shows the user accounts that we will be setting up in our lab environment:
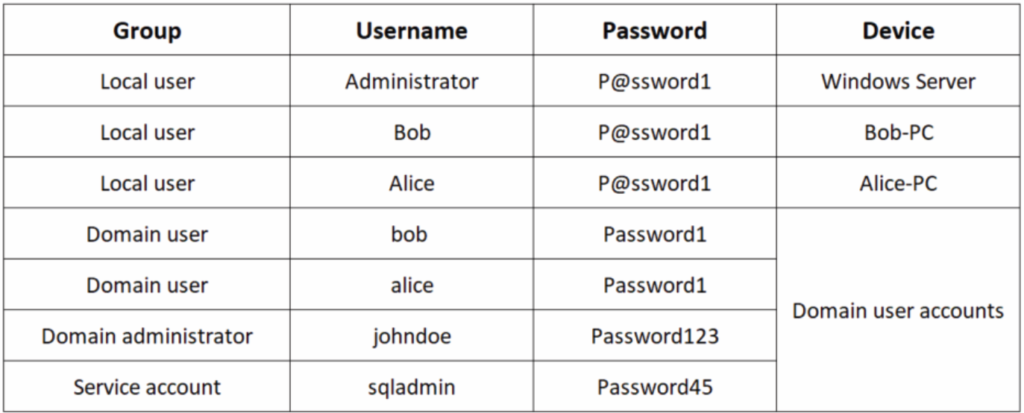
As we can see, we will create two domain users (Bob and Alice), an additional domain administrator ( johndoe ) and a service account with domain administrator rights ( sqladmin ).
In the following subsections, we will begin creating a Windows red team lab environment.
Part 1 – Installing Windows Server 2019
In this section, you will learn how to set up Microsoft Windows Server 2019 as a virtual machine. To get started with this exercise, use the following instructions:
- Go to https://www.microsoft.com/en-us/evalcenter/evaluate-windows-server-2019, click Windows Server 2019 , select ISO , and click Continue.
Be sure to fill out all fields on the form when it appears. Once completed, you will be prompted to save the ISO file to your system. - Then open VirtualBox Manager and click New to create a new virtual machine.
- The virtual machine creation window will appear. If you are not in Expert Mode, simply click Expert Mode to enable it.
Use the following parameters to create a Windows Server 2019 virtual machine:
Name: Windows Server 2019 (DC).
Type: Microsoft Windows
Version: Windows 2019 (64-bit).
Memory size: 4096 MB or more.
Hard Disk: Create a virtual hard disk now.
Once all these settings are configured, click “Create”. - Next, the “Create virtual hard disk” window will appear. Use the following settings here:
File size: 60 GB.
Hard disk file type: VHD (virtual hard disk).
Physical Hard Drive Storage: Dynamic
Once you have configured these settings, click Create. - You will be returned to the main VirtualBox Manager window.
Select Windows Server 2019 (DC) and click Settings. - Click the Network category and apply the following settings to adapter 1:
Enable adapter 1
Connected to: Internal network
Name: RedTeamLab
Promiscuous mode: Allow all - Then click on the “Storage” category. Under Storage Devices, select the CD/DVD icon. Then, under Attributes, click the CD/DVD icon to expand the drop-down menu. Select Select file on disk, navigate to the location of the Windows Server 2019 ISO file, select it, and click Open. The ISO file will be virtually downloaded to the virtual drive. Click OK.
- You will be returned to the main VirtualBox Manager window. Select the Windows Server 2019 virtual machine (DC) and click Start to turn on the machine.
- When the virtual machine boots, the Select Boot Disk menu appears. Simply use the drop-down menu to select the correct ISO file and click Start.
- When Windows Server boots, set your preferred installation language, time and format, and keyboard or input method. Then click “Next” to continue.
- In the Windows installation window, click Install Now.
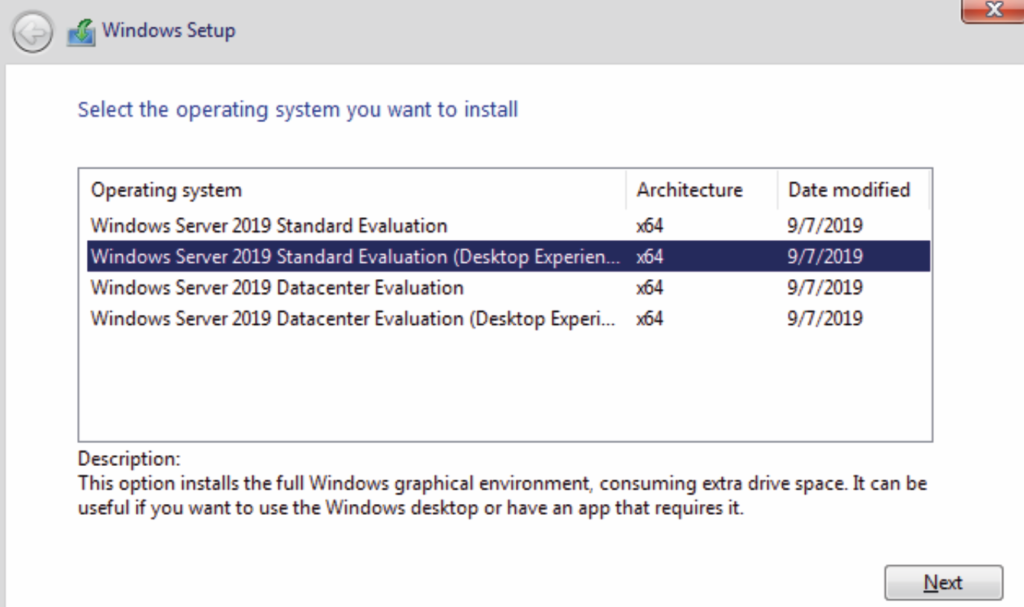
- Next, the Windows installation window will appear . Select Windows Server 2019 Standard Evaluation (Desktop Experience) and click Next as shown here:
- Then accept the applicable notices and license terms and click Next.
- Another window will appear asking how to proceed with the installation. Click “Custom: Install Windows Only (Advanced)” to continue.
- You will then be given the option to select the target drive for installing Windows Server . Select “Unallocated Disk Space 0” click “New” and then click “Apply” to create new partitions.
- Then select “Disk 0, Partition 2” and click “Next”.
The installation process will begin and will take some time. Once the installation is complete, the virtual machine will automatically reboot. - After the reboot, the Windows Server 2019 Setup Wizard will prompt you to create a local user account. Use the following parameters:
Name: Administrator
Password: P@ssword1 - Then log into the Windows Server 2019 virtual machine. You will need to use the softkeys in the VirtualBox menu bar. Just press Enter > Keyboard and paste Ctrl + Alt + Del .
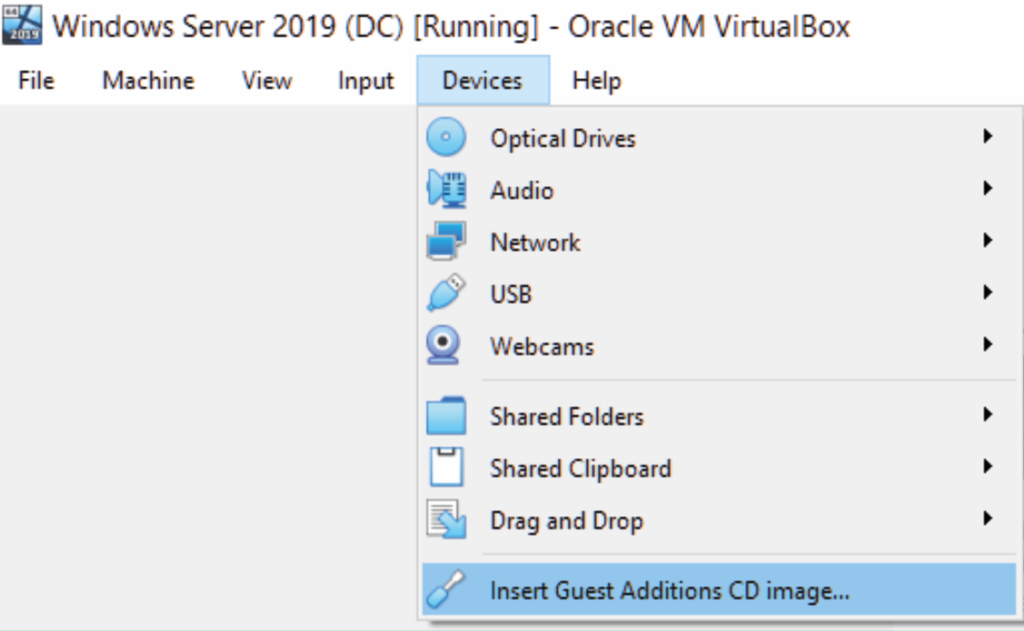
- To scale your virtual machine’s desktop resolution to fit your monitor size, in the VirtualBox menu bar, click Devices | Install the Guest Additions CD image as shown here:
20. Next, to install VirtualBox Guest Additions on your Windows 10 virtual machine , open Windows Explorer and navigate to “This PC” where you will see the virtual disk as shown here:
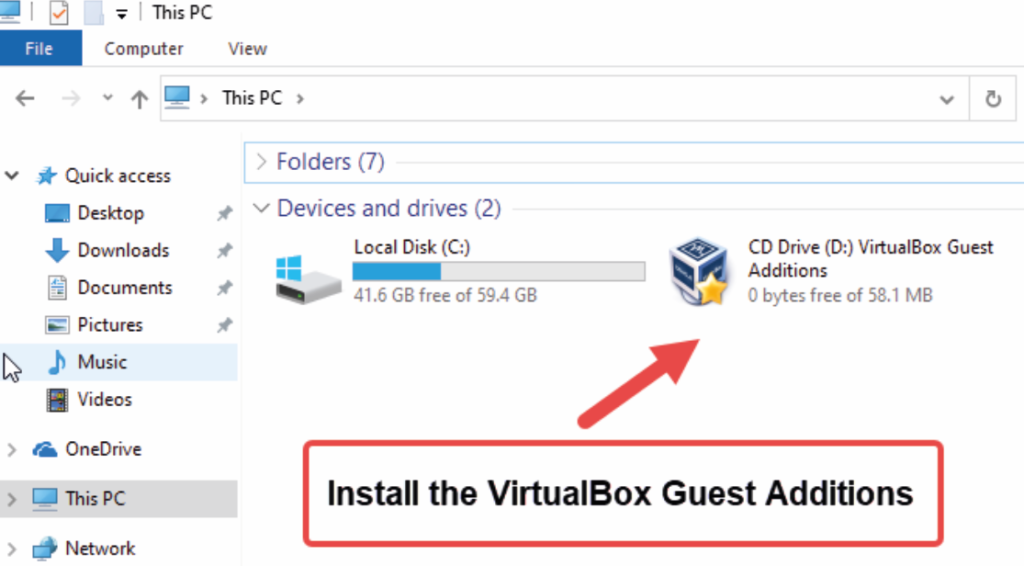
- Then double-click the VirtualBox Guest Additions virtual disk to install it on the virtual machine. Make sure you use the default settings during the installation process. When finished, do not reboot.
- On a Windows Server virtual machine, open Windows System Properties using the Windows key + R shortcut , open the Run application, type sysdm.cpl and click OK .

23. In the System Properties window, select the Computer Name tab and click Change…, as shown here:

- Change the computer name to DC1 and click OK.
- Next, the system will inform you that to apply these changes you need to reboot; click OK . Close the System Properties window and click Restart Now.
- After the system reboots, log in using administrator credentials. The desktop user interface automatically scales to match the resolution of your monitor. If it’s not, just toggle it using the VirtualBox menu bar | View | Option to automatically resize guest display.
By completing this exercise, you have learned how to create a Windows Server 2019 virtual machine.

That’s all. Have a nice day, everyone!
❤️ If you liked the article, like and subscribe to my channel “Codelivly”.
👍 If you have any questions or if I would like to discuss the described hacking tools in more detail, then write in the comments. Your opinion is very important to me!
